10 Muscle-Building Superfoods For Baseball Players
February 18, 2021
1) Protein shake (with whole milk) The hands-down easiest way to build muscle mass is to add two...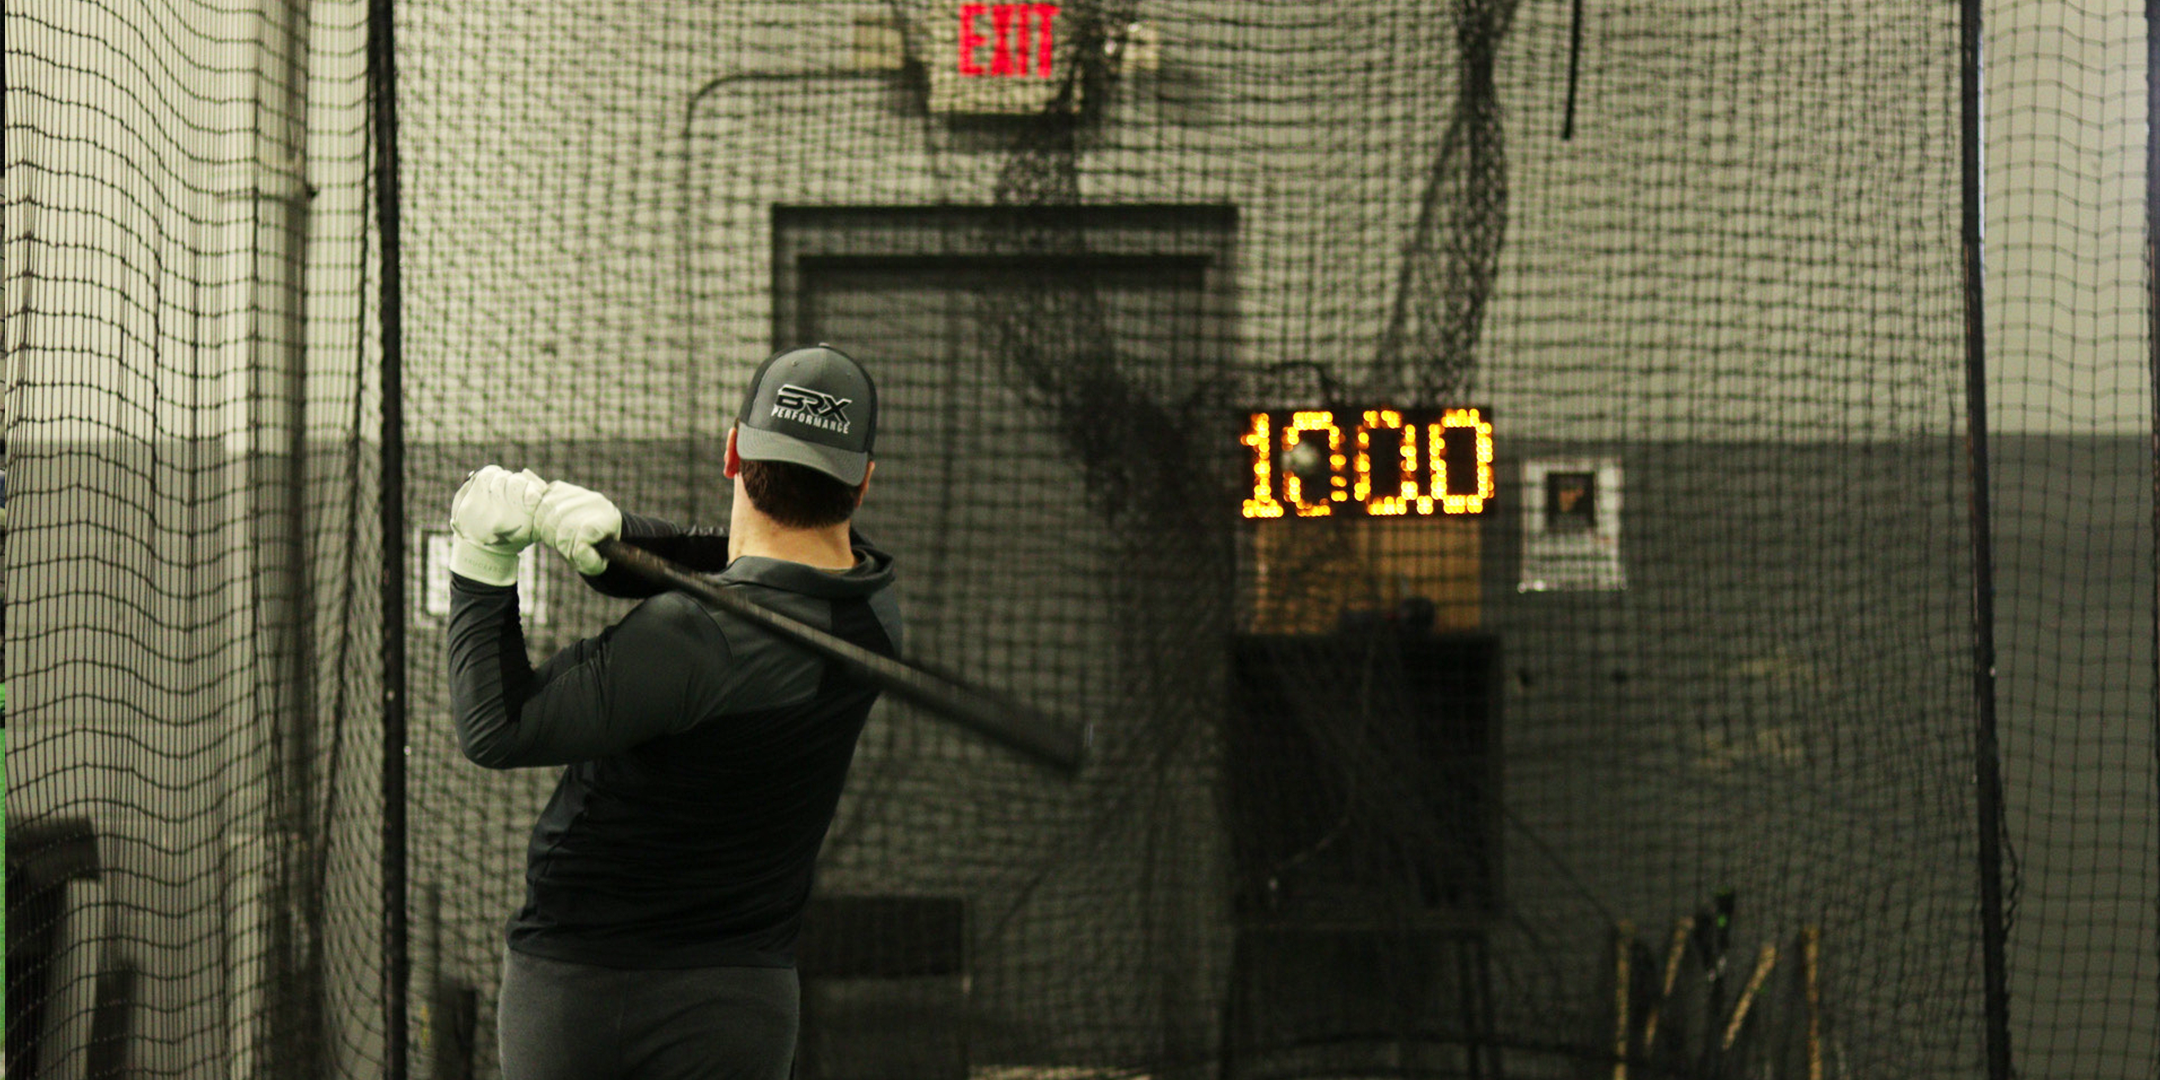
ATHLETES: How are you evaluating the progress and improvements you are making towards your goals? Are you ACTUALLY improving?
For any sport, it is incredibly beneficial to track performance numbers specific to the sport itself, and baseball/softball is no exception. Reassessing these numbers from time to time will also tell you whether or not the work you're putting in at the gym and on the field is paying off.
Most importantly, in order to show progress at any point in the future, you must establish your baseline numbers first. This goes for any performance numbers that are important for your sport.
Perhaps the three most important numbers for baseball and softball performance are throwing velocity, pitching velocity, and exit velocity.
Without concrete numbers obtained from a reputable radar gun and video proof of these numbers, you're basically flying blind, and no one will take your velocity claims seriously. Our goal with this resource is to teach you how to accurately assess velocity and record video to prove these numbers on your own, so that we can all demonstrate progress accurately.
To accurately test ball velocities, you must be using a reputable radar gun that has proven accuracy to within +/- 1 mph. These include options like:
For most cases, the Pocket Radar Smart Coach offers the ideal blend of affordability, accuracy, and convenience.
It is futile to test ball velocities with lower-grade options, especially for higher-level players.
Other things you need are:
The day of testing, save any lifting/training you are planning on doing that day until AFTER testing. This will help make sure you're fresh and 100% ready for velocity testing.
Here are the numbers we want you to get:
On testing day, make sure to have fresh batteries for your radar gun, and a tripod + mount so that you can mount the radar or your phone (or both using a universal tripod mount).
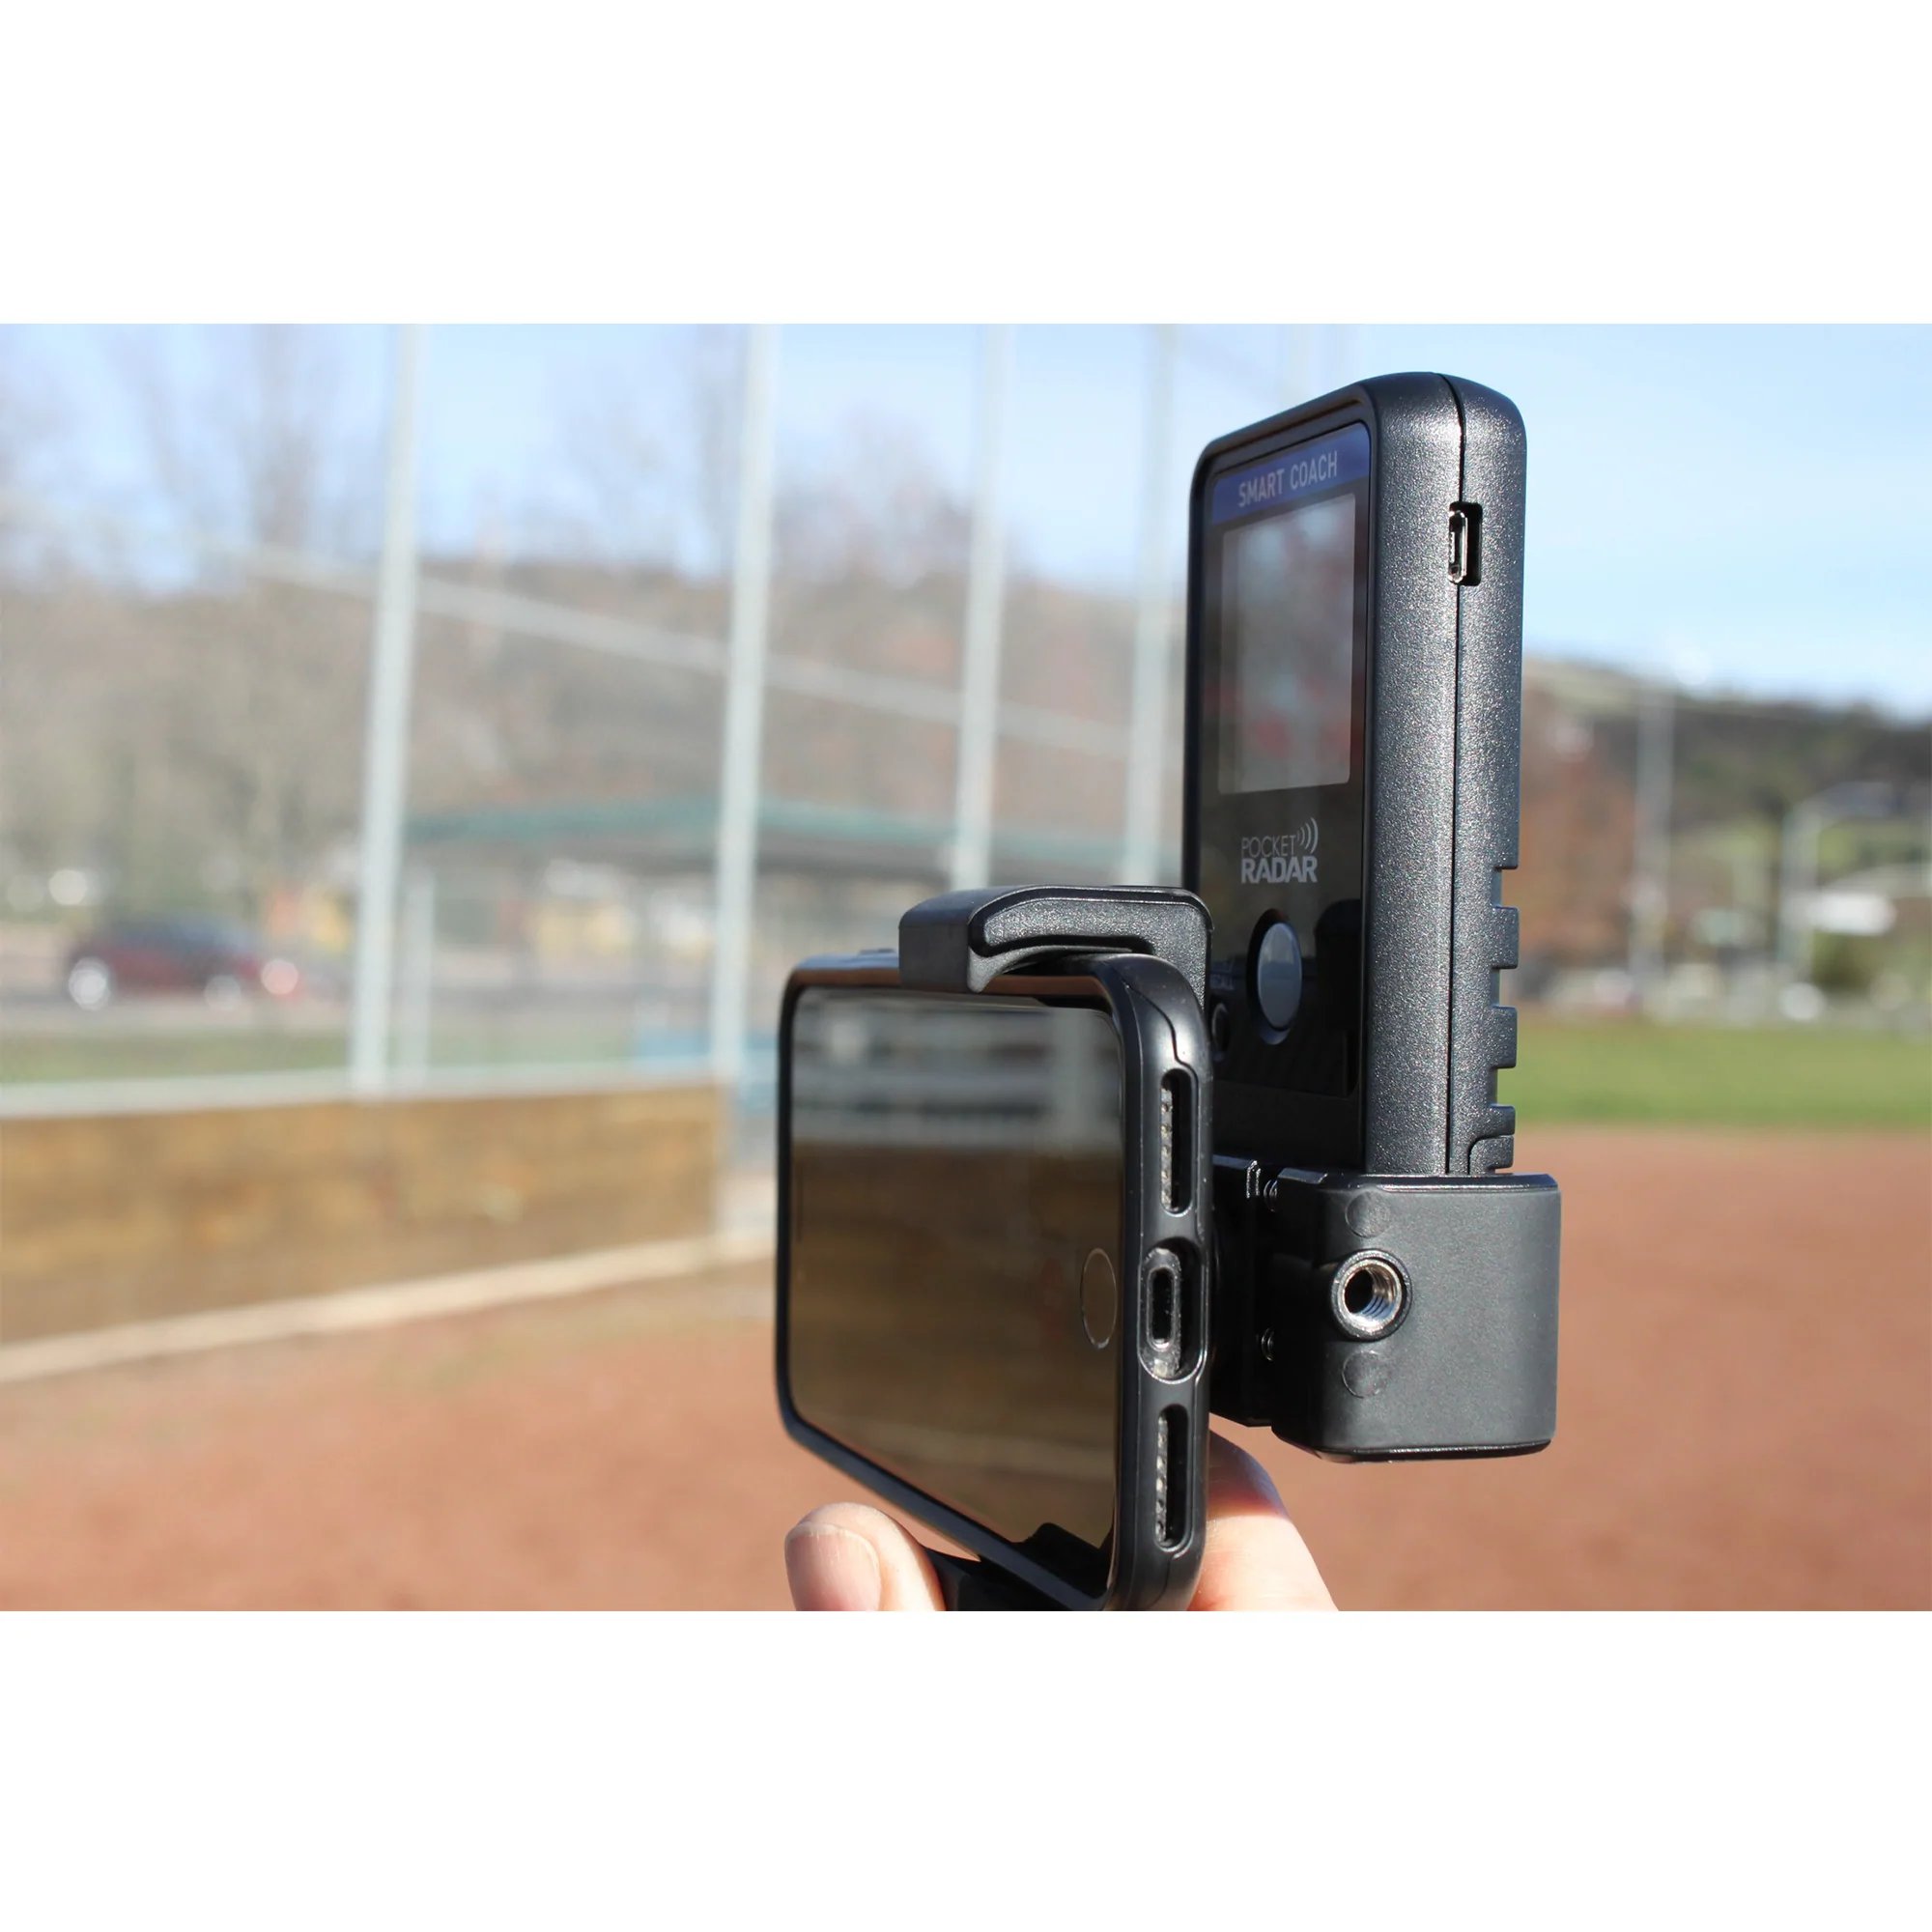
Above, you can see the universal tripod mount in action holding both the Pocket Radar and phone on a single tripod.
We are looking for two big things:
Pocket Radar has excellent videos and diagrams demonstrating proper set-up here:
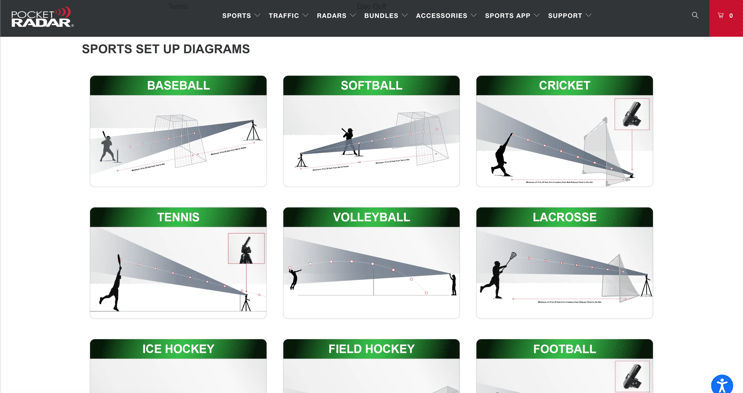
Pocket Radar Set-up Diagrams and Demos
The most important takeaway from these diagrams and demos is that your radar gun has to be aimed directly IN LINE with the path of the ball for the most accurate reading. This is something that we can't impress upon our athletes and parents enough!
You also want to ensure adequate spacing between the radar gun and the release/contact point of the ball to give the radar gun the highest chance of picking up the ball within its beam of coverage. 10-15 feet of space is our general recommendation here.
If you are using the Pocket Radar Smart Coach, download the Pocket Radar mobile app to pair the radar to your phone. This allows velocity reads to be embedded directly into the videos of the testing. The first two tutorials below demonstrate how to use the app for the Pocket Radar Smart Coach, as well as velocity videos obtained through the app:
Note how in the sample videos, you can clearly see the velocity attempt as well as the ensuing read of the velocity from the Pocket Radar.
For an athlete to do this sort of testing session on their own, they would need to mount both their radar gun and their phone with tripod(s).
If an athlete has help, we would recommend the helper to operate the phone with the Pocket Radar Sports App running and actively recording, while the radar gun is running and mounted on a tripod.
On testing day, make sure you are feeling 100% fresh and ready -- little to no body soreness, lots of sleep the night before, etc. Remember, we can always postpone testing to another day if you aren't feeling well!
As far as actual testing is concerned, do your full mobility/dynamic warm-up beforehand. Follow up on this with the pre-game/pre-practice throwing routine--get comfortable and lock yourself in for the ride.
After throwing plyos, start using a normal ball. Make sure you get a few reps in that resemble the throwing motion you’re testing, increasing you throwing intensity and arm speed on each rep, slowly but surely.
Take your time warming up to decrease your chance of hurting yourself.
When ready, you want to throw in a way that is specific to your playing position. Pitchers should use their pitching motion off a mound. Position players should either pretend like they are fielding/receiving the ball, or have someone roll/throw the ball to them. Infielders should then throw from a shuffle-step; outfielders, from a crow hop; catchers, from the crouch.
Cap yourself at 10 full-intensity throws each for your pitching and position velos.
Here's an example of a testing session for throwing with relevant instructions:
For hitting, take a few swings, increasing you intensity and bat speed on each rep, slowly but surely. Get ready to swing as hard as you can.
Set up your tee right where you want the ball, and go for it! For pure velocity purposes, you should hit the ball directly at the radar gun for the best result.
Cap yourself at 15-20 full-intensity swings.
Here's an example of a testing session for hitting with relevant instructions:
When you're done, verify that videos of your velocity attempts have been saved to your Camera Roll. Cut out clips of each attempt for each test (especially your best ones!), and send them over to your performance coach!
We will then review how everything went as soon as we can. Rest up!
First and foremost, if you haven't already, you should test for your baseline numbers and record videos of them AS SOON as possible.
There is a good chance you will not be happy with the initial results. This is not an excuse to quit and take the processes outlined here lightly. You need to establish your baseline and get video of these numbers to accurately demonstrate future progress to us and to yourself. Leave your ego out of this equation, and make time for yourself to conduct baseline testing. It is that important.
Here at BRX, we typically have athletes conduct their first "Reassessment" 90 days or 3 months after initial testing, barring any injury or arm health concerns. If all goes to plan, athletes would have completed 3 full phases of training by this point.
Athletes who've completed their first reassessment should test out their numbers twice a year: once at the beginning of the offseason (around September), and right before the beginning of the season (around March). This sets benchmarks and goals for the offseason, which is usually the best time period for athletes to focus on their development.
Performance testing is an arduous process that has many moving parts, but it's something that we are incredibly passionate about. Without this, we would not be able to accurately demonstrate progress for our athletes. Hopefully, this resources helps you set up properly for your testing session so that you can focus on execution and getting the velocity numbers that matter to you!
February 18, 2021
1) Protein shake (with whole milk) The hands-down easiest way to build muscle mass is to add two...February 18, 2021
Infielding The infielding portion of a showcase is where strategy plays a critical role.February 15, 2021
BRX is about finding your baseball potential from deep within that no one else sees besides...

